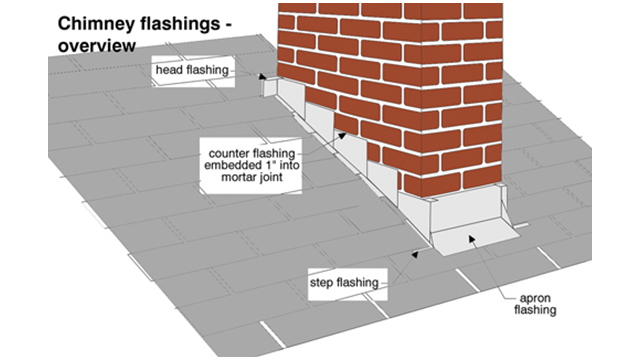
Counter flashing is bent down and installed in the mortar joints of your chimney. It is the metal or sealant layers that are meant to provide a watertight seal between the chimney and the roofline.
 Chimney Leakage Problems Causes How To Fix
An apron flashing is the first piece of flashing installed along the bottom side of the chimney.
Flashing a chimney. A second layer of metal is embedded in the chimney mortar joints and folded down to cover the top of the step flashing. Cut the bottom of the sidewall flashing at 45 degrees and the top such that it will bend around the uphill side of the chimney. Base flashing and counterflashing.
Depending on the size material and installation flashing can last well over 30 years. This metal prevents any moisture from getting between the roof and the chimney which would then get into your home. Whatever material you use the target is to completely lock water and moisture away from leaking into your house.
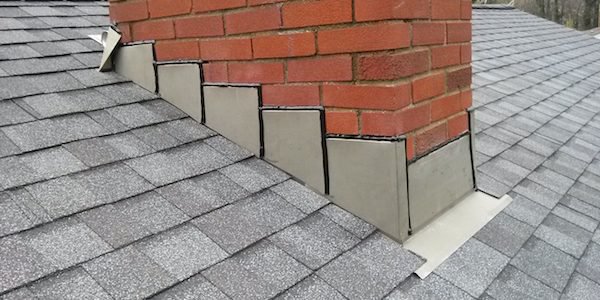
Slide sidewall flashing into place and fasten into the chimney with masonry anchors. Flashing a chimney correctly involves two layers of water-shedding metal. On top of the step flashing is the counter flashing.
The first step to replacing your chimney flashing is to make sure you have a safe and secure attachment to your roof. It must be watertight. About Press Copyright Contact us Creators Advertise Developers Terms Privacy Policy Safety How YouTube works Test new features.
Secure the cap flashing by inserting the flashings flange all the way into the mortar. Flashing a chimney involves sealing the space formed where the chimney meets with your roof. Chimney flashing exists at the base of the stack.
Chimney flashing is pieces of metal that are installed at the area where the chimney of a fireplace meets the roof. Bend the cap flashing around the front of the chimney. Fasten apron into the chimney with masonry anchors.
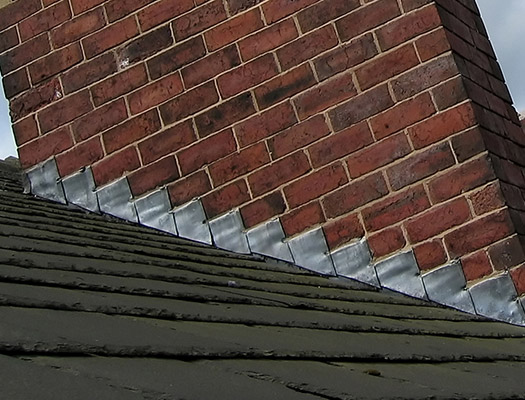
Hammer the plastic anchors into the holes. Sections of L-shaped sheet metal are woven into the shingle courses and lapped up the side of the chimney. Chimney flashing looks complicated because it involves two distinct components.
Each of these ideally would have a base step if its on the sides flashing and a cap counter flashing. When installing a chimney single step flashing using individual layers of flashing it is best to lay your roof tiles and lead flashing at the same time. Mark shows you how to markup the layout for the proper bends.
The base flashing covers the joint between the chimney and the roof ensuring that all the water that flows down the roof is channeled back onto the surface of the shingles. The first is called step flashing. Each layer of flashing is then covered by the roof tile as you work your way up the side of your chimney.
This is critical as a fall could lead to serious injury. Tips on Flashing a Chimney Part 1 on a shingle roof. Repeat the procedure around each side of the chimney.
A Do-it-yourself Video detailing step by step how to flash a chimney with our Metal Roofing Chimney Kit. Fit the front cap flashing around the front of the chimney. The back has a similar piece called the pan.
However bottom flashings and top flashings where there is no saddle often are one piece. The front of the chimney has a single piece of flashing the apron as the first layer. Proper flashing around a chimney includes two layers.
After you are secured on the roof remove the shingles surrounding the chimney flashing. Apply sealant to the apron where sidewall flashings will overlap. The first is the base or step flashing which is found under your roofs shingles and bent upwards against your chimneys exterior.
Drill a hole on each side of the chimney front. However the most critical attribute of the flashing is simple. Next comes the counterflashing.
There are a few parts that make up the entire chimney flashing. On a chimney flashing is required at the bottom the sides and the top. This protective system is made in a variety of different means and techniques.
At this point youll be replacing the step flashing and following up with weaving the singles and flashing back in.
 Chimney Flashing And Repair Champion Roofing
 Guide To Roof Flashing Installation Roof Flashing Repair Types Iko
 Installing Chimney Flashing Diy Family Handyman
 Chimney Flashing Repair Hillsborough Nh Black Moose Chimney
/cdn.vox-cdn.com/uploads/chorus_asset/file/19489400/chimney_water_x.jpg) Leakproof Flashing This Old House
Leakproof Flashing This Old House
 In The Event Of A Chimney Leak Check The Flashing
 Chimney Flashings
 How To Flash A Chimney 6 Steps With Pictures Wikihow
 Chimney Flashings Carson Dunlop Home Inspection Training
Chimney Flashing Barnhill Chimney
 Chimney Flashing Repair Vt Nh Chimney Savers
 What Is Chimney Flashing And Why Is It Important
 Roof And Chimney Flashing Is Your Home Watertight Chimneys Plus
 Expert Chimney Flashing Installation In Winchester Tn Customer Service
Comments
Post a Comment